Igloo Cake is a wonderfully creative and festive dessert, perfect for winter holidays, Arctic-themed parties, or as a stunning centerpiece. It’s essentially a dome-shaped cake decorated to look like a sparkling ice hut.
Here are two approaches: a traditional baked version and a simpler, no-bake option using store-bought components.
Option 1: Traditional Baked Igloo Cake (From Scratch)
This method uses two bowl cakes to create a perfect dome.
Prep Time: 1.5 hours (plus cooling) | Bake Time: 1 hour | Decorating: 45 mins | Serves: 12-15
Ingredients
For the Cake:
- Your favorite white or vanilla cake recipe for two 9-inch rounds PLUS batter for one extra layer (or use 1.5 boxes of white cake mix).
- Baking Method: You’ll bake in two oven-safe stainless steel mixing bowls (one ~8-inch, one ~6-inch) to get the dome shape.
For the Frosting & Structure:
- 4-5 cups vanilla buttercream frosting (stiff consistency, for crumb coat and assembly)
- 1 batch Royal Icing (for the “ice blocks” – dries very hard) OR 2 lbs white fondant
- Optional support: 4-5 wooden skewers
For Decoration & Scene:
- Blue piping gel or tinted frosting for “ice water” base
- Powdered sugar or coconut flakes for “snow”
- Graham crackers or white chocolate bars for an “ice fishing hole”
- Mini figurines (penguins, polar bears, Eskimos)
- Peppermints, silver dragees, or clear sparkling sugar for sparkle
- Marshmallows (for tiny snowmen)
Instructions
1. Bake the Dome:
- Grease and flour the insides of two stainless steel mixing bowls (one larger, one smaller). Fill each no more than ⅔ full with cake batter.
- Bake at temperature per your recipe, but add 15-25 minutes to the usual time. Cakes are done when a skewer inserted comes out clean.
- Cool completely in the bowls, then carefully turn out.
2. Assemble the Igloo:
- Place the larger dome flat-side down on your cake board as the base.
- Trim the flat side of the smaller dome so it sits steadily on top of the larger one, creating a seamless dome shape.
- Optional: Insert 2-3 skewers through the center to secure the tiers.
- Apply a thin crumb coat of buttercream over the entire dome. Chill for 30 minutes.
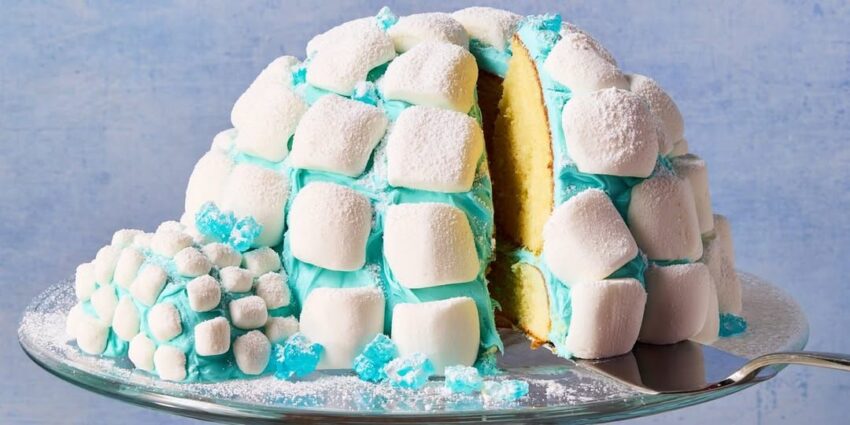
3. Create the “Ice Blocks”:
- Royal Icing Method: Fill a piping bag with thick royal icing. Pipe horizontal lines of icing in a staggered brick pattern all over the dome, starting from the bottom. Let dry completely (creates a hard, realistic shell).
- Fondant Method: Roll white fondant to ¼-inch thickness. Cut into small rectangular “blocks.” Starting at the bottom, apply blocks in overlapping rows, using a dab of water or buttercream as glue. Curve the rows as you go up.
4. Create the Entrance:
- Carefully cut a small arched doorway near the bottom of the igloo. You can use the removed cake piece as a “door” placed outside.
- Line the inside of the entrance with more icing blocks or fondant.
5. Build the Scene:
- Spread blue piping gel around the base for water.
- Sprinkle powdered sugar or coconut around for snow.
- Add figurines, create a fishing hole (a circle of blue gel with broken graham cracker “ice”), and build mini marshmallow snowmen.
- For sparkle, lightly brush the igloo with a bit of water or clear vanilla extract and sprinkle with coarse white or clear sanding sugar.
Option 2: Easy No-Bake Igloo Cake (Using Store-Bought)
A fantastic, less stressful option that’s great for kids to help with.
Base: One large, round bakery sponge cake or two packages of large white cupcakes.
Dome: Large quantities of white chocolate or vanilla marshmallows (like jumbo jet-puffed) or large white doughnuts (like Entenmann’s).
Assembly:
- Place the round cake on a board.
- “Glue” marshmallows or doughnuts together with white frosting in a dome shape on top of the cake.
- Use a stiff vanilla frosting or canned white frosting as mortar between the marshmallows/doughnuts.
- Decorate as above with sugar snow and figurines.
Key Tips for Success
- Stability is Key: If your cake dome feels wobbly, use skewers for internal support and chill thoroughly before decorating.
- The Royal Icing Trick: This is the secret to a professional, “icy” look that hardens like cement. It’s worth the extra step.
- Color Theme: Keep it monochromatic (whites, blues, silvers) for the most realistic ice effect.
- Serving: For the baked version, slice like a normal cake. For the marshmallow version, simply pull apart the marshmallows.
