Ah, oatmeal cookies — a classic! Here’s a breakdown of everything you might want to know, from a basic recipe to tips for perfect cookies.
Classic Chewy Oatmeal Cookie Recipe
This is a versatile base recipe. You can add raisins, chocolate chips, nuts, or spices as you like.
Ingredients:
-
1 cup (2 sticks) unsalted butter, softened
-
1 cup packed brown sugar
-
½ cup granulated sugar
-
2 large eggs
-
1 tsp vanilla extract
-
1½ cups all-purpose flour
-
1 tsp baking soda
-
1 tsp ground cinnamon (optional, but recommended)
-
½ tsp salt
-
3 cups old-fashioned rolled oats (not instant)
Optional add-ins (1-1.5 cups total):
-
Raisins or dried cranberries
-
Chocolate chips (semi-sweet or white)
-
Chopped walnuts or pecans
-
½ tsp nutmeg or ginger
Instructions:
-
Prep: Preheat oven to 350°F (175°C). Line baking sheets with parchment paper.
-
Cream wet ingredients: In a large bowl, beat butter and both sugars until light and fluffy. Beat in eggs one at a time, then vanilla.
-
Combine dry ingredients: In a separate bowl, whisk flour, baking soda, cinnamon, and salt.
-
Mix: Gradually add dry ingredients to wet, mixing just until combined. Stir in oats and any add-ins.
-
Bake: Drop rounded tablespoons of dough onto sheets, spacing 2 inches apart. Bake for 10–12 minutes, until edges are golden but centers look slightly soft.
-
Cool: Let cool on sheet for 5 minutes, then transfer to a rack.
Tips for Perfect Oatmeal Cookies
-
For chewy cookies: Use all brown sugar (instead of half white). Slightly underbake.
-
For crisp edges/chewy centers: Use the recipe as written (mix of sugars) and don’t over-flour.
-
Oat choice matters: Old-fashioned oats give the best texture. Quick oats make a more uniform, softer cookie; avoid steel-cut (too hard).
-
Chill dough (optional): Chilling 30–60 minutes prevents excess spreading and deepens flavor.
-
Don’t overmix: Once flour is incorporated, stop. Overmixing = tough cookies.
-
Add-ins: If using raisins, plump them first in warm water or rum for 10 minutes, then pat dry.
Common Variations
-
Oatmeal Raisin: Add 1 cup raisins and ½ tsp nutmeg.
-
Oatmeal Chocolate Chip: Swap raisins for 1–1½ cups chocolate chips.
-
Oatmeal Scotchies: Replace chocolate chips with butterscotch chips.
-
Monster Cookies: Add ½ cup peanut butter to wet ingredients, plus chocolate chips and M&M’s.
-
Gluten-free: Use certified GF oats and a 1:1 GF flour blend.
-
Vegan: Use flax eggs, vegan butter, and coconut sugar.
Why They’re Great
-
Texture contrast: Chewy, soft, with a slight bite from oats.
-
Wholesome flavor: Oats add a nutty, hearty base.
-
Customizable: Endless add-in possibilities.
-
Nostalgia factor: Comfort food for many.
Storing
-
Store in an airtight container at room temp for up to 5 days.
-
Freeze dough balls or baked cookies for up to 3 months.
Want to tweak something? Looking for a specific style (thin & crisp, cakey, etc.)? Let me know!
San Marzano Tomato Sauce
The gold standard of Italian tomato sauces. Simple, elegant, and deeply flavorful. Not all “San Marzano-style” tomatoes are equal — look for DOP (Denominazione d’Origine Protetta) certification for the real thing.
What Makes San Marzanos Special?
-
Origin: Grown in the volcanic soil near Mount Vesuvius in Campania, Italy.
-
Flavor: Naturally sweeter, less acidic, with a rich, complex tomato taste.
-
Texture: Thinner skin, fewer seeds, and denser flesh, yielding a smoother sauce.
-
Shape: Oblong (“plum tomato”) with a pointed end.
Classic San Marzano Tomato Sauce Recipe
Ingredients:
-
1 can (28 oz / 800g) whole peeled San Marzano tomatoes (DOP certified)
-
¼ cup extra-virgin olive oil
-
4 cloves garlic, lightly smashed (peeled)
-
¼ tsp red pepper flakes (optional)
-
5–6 fresh basil leaves, plus more for garnish
-
1 tsp salt (or to taste)
-
½ tsp black pepper (optional)
-
1 small onion, peeled and halved (optional, for sweetness)
Instructions:
-
Prep tomatoes: Gently crush the tomatoes by hand into a bowl, preserving their juice. This gives a rustic, varied texture. (Alternatively, use a food mill for smooth sauce.)
-
Infuse the oil: In a large saucepan or deep skillet, heat olive oil over medium-low. Add smashed garlic and optional red pepper flakes. Sauté until garlic is fragrant and lightly golden (about 3–4 minutes). Do not burn garlic — it will turn bitter.
-
Simmer: Add crushed tomatoes and their juice. If using, add onion halves. Tear basil leaves and add. Bring to a gentle simmer.
-
Cook: Reduce heat to low. Simmer uncovered for 30–45 minutes, stirring occasionally, until sauce thickens and oil glistens on top.
-
Season & finish: Remove garlic cloves and onion (if used). Season with salt and pepper. For extra silkiness, stir in 1 tbsp cold butter at the end (optional).
-
Serve: Toss with cooked pasta (reserve some pasta water to adjust consistency) and garnish with fresh basil.
Key Techniques & Tips
-
Do not overcook: San Marzanos have delicate flavor. Simmer gently; 30–45 minutes is enough. Longer cooking can dull brightness.
-
Hand-crushing vs. blending: Hand-crushing yields authentic texture. Never use a food processor with seeds and skin — it can make sauce bitter. If you prefer smooth, use a food mill to remove seeds/skin.
-
Low-and-slow garlic: Gently infusing garlic in oil builds flavor base without bitterness.
-
Salt timing: Add salt midway or at the end to control reduction; salt early if sauce will cook briefly.
-
Onion option: Adding a halved onion draws out sweetness without onion pieces in final sauce.
Variations
-
Marinara: Add ½ cup dry white wine after garlic step; reduce before adding tomatoes.
-
Arrabbiata: Increase red pepper flakes to 1 tsp; finish with fresh parsley.
-
Vodka Sauce: Add ¼ cup vodka after tomatoes, simmer 10 mins, then stir in ½ cup heavy cream.
-
Puttanesca: Add 4 chopped anchovy fillets with garlic, then capers, olives, and red pepper flakes.
How to Choose Authentic San Marzano Tomatoes
Look for:
-
“DOP” seal on the can (guarantees origin and quality standards).
-
“Pomodoro S. Marzano dell’Agro Sarnese-Nocerino” wording.
-
Whole peeled tomatoes in tomato juice or purée (not already crushed or puréed).
-
Grown/packed in Italy (not from California or elsewhere).
-
Shape: Elongated plum tomato with pointed end.
Popular DOP brands: Mutti, Cento, La Valle, Nina, Rega.
Why This Sauce Stands Out
-
Minimalism: It’s about showcasing tomato quality, not masking with herbs/spices.
-
Balance: Natural sweetness balances acidity without needing sugar.
-
Versatility: Base for pizza, pasta, meatballs, shakshuka, braises.
Storage
-
Refrigerate up to 5 days.
-
Freeze up to 6 months (omit fresh basil before freezing; add fresh when reheating).
-
Can be canned using proper preserving methods.
Final advice: Once you taste a true San Marzano DOP sauce, it’s hard to go back. The tomatoes do the heavy lifting — your job is just not to get in their way. Buon appetito! 🍅
Creamy Spinach & Mushroom Lasagna
A luxurious, vegetarian lasagna that’s rich, savory, and layered with a creamy béchamel instead of traditional ricotta. Perfect for a comforting dinner or special occasion.
Recipe: Creamy Spinach & Mushroom Lasagna
Ingredients
For the Mushroom & Spinach Filling:
-
2 tbsp olive oil
-
1 large onion, finely chopped
-
4 cloves garlic, minced
-
1½ lbs (680g) cremini or baby bella mushrooms, sliced
-
10 oz (285g) fresh spinach (or 1 lb frozen, thawed and squeezed dry)
-
½ cup dry white wine (or vegetable broth)
-
1 tsp dried thyme
-
½ tsp nutmeg (freshly grated if possible)
-
Salt and black pepper to taste
For the Creamy Béchamel Sauce:
-
½ cup (1 stick / 115g) unsalted butter
-
½ cup all-purpose flour
-
5 cups whole milk, warmed
-
1 cup grated Parmesan cheese
-
½ tsp nutmeg
-
Salt and white pepper to taste
For Assembly:
-
12 no-boil lasagna noodles (or fresh lasagna sheets)
-
3 cups shredded mozzarella cheese (or Italian blend)
-
½ cup grated Parmesan for topping
-
Fresh parsley or basil for garnish (optional)
Instructions
1. Prepare the Filling:
-
Heat olive oil in a large skillet over medium heat. Sauté onion until soft (5-6 mins).
-
Add garlic and mushrooms. Cook until mushrooms release liquid and brown (10-12 mins).
-
Add white wine to deglaze, scraping up browned bits. Cook until wine evaporates.
-
Stir in spinach in batches until wilted. Season with thyme, nutmeg, salt, and pepper. Set aside.
2. Make the Béchamel:
-
In a medium saucepan, melt butter over medium heat. Whisk in flour and cook 1-2 minutes (do not brown).
-
Gradually whisk in warm milk until smooth. Bring to a simmer, whisking constantly until thickened (about 5-7 mins).
-
Remove from heat. Stir in Parmesan, nutmeg, salt, and white pepper.
3. Assemble the Lasagna:
-
Preheat oven to 375°F (190°C). Grease a 9×13-inch baking dish.
-
Spread ½ cup béchamel on the bottom of the dish.
-
Layer: 4 noodles → ⅓ of mushroom-spinach filling → ⅓ of remaining béchamel → 1 cup mozzarella. Repeat twice.
-
Top final layer with noodles, any remaining béchamel, mozzarella, and Parmesan.
4. Bake:
-
Cover with foil (tented so it doesn’t stick to cheese). Bake 25 minutes.
-
Remove foil. Bake uncovered 15-20 mins until golden and bubbly.
-
Let rest 15 minutes before slicing (crucial for clean layers!).
Key Tips for Success
1. Avoid Soggy Lasagna:
-
Squeeze spinach dry: Remove as much moisture as possible from fresh or thawed frozen spinach.
-
Cook mushrooms well: Let them release liquid and brown — no excess moisture.
-
Use no-boil noodles correctly: Ensure sauce covers noodles completely; they absorb liquid from béchamel.
-
Rest before slicing: Allows layers to set.
2. Flavor Boosters:
-
Umami kick: Add 2 tbsp soy sauce or 1 tbsp miso to mushroom filling (sounds unconventional, but it works!).
-
Herbs: Add 2 tsp chopped fresh rosemary with thyme.
-
Garlic: Roast whole garlic cloves and mash into béchamel.
-
Cheese swap: Substitute 1 cup fontina or gruyère for some mozzarella.
3. Make-Ahead & Freezing:
-
Assemble 1 day ahead: Refrigerate covered. Bake 10-15 minutes longer.
-
Freeze unbaked: Wrap tightly. Thaw overnight in fridge before baking.
-
Freeze baked: Slice portions, wrap individually. Reheat in oven at 350°F until warmed through.
Variations
1. Vegan Version:
-
Béchamel: Use plant butter, flour, and unsweetened soy/oat milk + ¼ cup nutritional yeast.
-
Cheese: Vegan mozzarella shreds or cashew ricotta.
-
Filling: Add 1 cup cooked lentils for heartiness.
2. Protein Additions:
-
Add 1 lb Italian sausage or ground beef (browned) to mushroom layer.
-
Layer with sliced roasted chicken or turkey.
3. Greens Swap:
-
Substitute kale, Swiss chard, or broccoli rabe for spinach.
4. White Wine Substitute:
-
Use vegetable broth + 1 tbsp lemon juice.
Serving Suggestions
-
With: Garlic bread, crisp green salad with lemon vinaigrette, roasted vegetables.
-
Wine pairing: Chardonnay, Pinot Grigio, or a light Chianti.
-
Leftovers: Taste even better next day! Reheat in oven for best texture.
Why This Lasagna Stands Out
-
Elegant comfort food: Béchamel adds creamy sophistication.
-
Vegetarian centerpiece: Satisfying even for meat-lovers.
-
Layered flavors: Earthy mushrooms, sweet spinach, rich sauce.
-
Perfect for crowds: Feeds 8-10, and everyone loves it.
Final tip: Don’t rush the mushroom browning or sauce thickening — those steps build deep flavor and perfect texture. This lasagna is worth the love! 🧀🍄
Canning Homemade Meatloaf: A Complete Guide
Important Safety Note: Canning meatloaf is not recommended by USDA or reputable food safety authorities. Traditional meatloaf contains a combination of meat, breadcrumbs, eggs, and other ingredients that create an unpredictable density, pH, and heat penetration profile, making safe processing times impossible to determine.
However, you can safely can the meat component of meatloaf, then assemble and bake it later. Here’s how to do that:
Safe Alternative: Canning Seasoned Ground Meat for “Meatloaf Assembly”
Ingredients for Canning
-
Ground meat (beef, pork, turkey, or a blend), lean/fat ratio 85/15 or leaner
-
Canning salt (optional, ½ tsp per pint)
-
Broth or water (for packing)
-
Seasonings (add after canning — see below for safe approach)
Why You Can’t Can Full Meatloaf Mix:
-
Density issues: Breadcrumbs, eggs, and vegetables alter heat penetration.
-
pH level: Meatloaf is low-acid, but added ingredients make processing times unreliable.
-
Texture: Eggs, milk, and binders break down during pressure canning, becoming mushy or gritty.
-
No tested recipe: No USDA-approved process exists for canning mixed-ingredient meatloaf.
Step-by-Step: Canning Seasoned Meat Base
1. Prepare Meat:
-
Brown ground meat in batches without overcrowding. Drain excess fat.
-
Do not add onions, garlic, breadcrumbs, eggs, or liquid seasonings before canning.
2. Pack Jars:
-
Use clean, hot pint jars (quarts require much longer processing and are not ideal for ground meat).
-
Add ½ tsp canning salt per pint (optional).
-
Pack hot meat into jars, leaving 1-inch headspace.
-
Cover with boiling water, broth, or tomato juice (for flavor), maintaining headspace.
3. Process (Pressure Canning ONLY):
-
Wipe rims, apply lids/bands.
-
Process in a pressure canner:
-
Pints: 75 minutes at 10 PSI (adjust for altitude: 15 PSI above 1,000 ft).
-
Quarts: 90 minutes at 10 PSI (15 PSI above 1,000 ft).
-
-
Follow your canner’s manual for venting and cooling procedures.
After Canning: Make “Quick Assembly Meatloaf”
When ready to eat:
-
Open a jar of canned seasoned meat base, drain liquid.
-
In a bowl, mix meat with:
-
½ cup breadcrumbs or rolled oats per pint
-
1 egg per pint
-
¼ cup finely chopped fresh onions, garlic, herbs
-
2 tbsp ketchup or tomato paste
-
Optional: Worcestershire sauce, mustard, etc.
-
-
Shape into loaf, top with glaze, bake at 375°F (190°C) for 40–45 minutes.
If You Insist on Canning Pre-Mixed Meatloaf (Not Recommended)
If you choose to proceed against recommendations, understand the serious risks of botulism and spoilage. At minimum:
-
Use only lab-tested ingredients: Follow the Ball Blue Book recipe for “Ground or Chopped Meat” and add no binders.
-
Skip risky ingredients: No eggs, dairy, bread, oats, or fresh vegetables.
-
Pressure can: Process pints for 90 minutes at 10 PSI (increased time for density).
-
Acidify: Add 1 tbsp bottled lemon juice or vinegar per pint to lower pH slightly (not a guarantee of safety).
Again, this is not approved or safe by modern standards.
Safer Alternatives to Canning Meatloaf
-
Freeze Instead:
-
Bake meatloaf, cool completely, wrap slices tightly, freeze up to 3 months.
-
Freeze raw meatloaf mix in a loaf pan, then pop out and wrap; thaw and bake later.
-
-
Dehydrate for Camping:
-
Cook, crumble, and dehydrate meatloaf into “meat crumbles.” Rehydrate with hot water.
-
-
Can Separate Components:
-
Can plain ground meat.
-
Can tomato-based glaze separately (acidified).
-
Keep dry breadcrumbs and seasonings on shelf.
-
Assemble when ready.
-
Safety Checks for Home-Canned Meat
-
Always use a pressure canner — boiling water bath is not safe for meat.
-
Check seals: Lids should be concave and not flex when pressed.
-
Inspect before opening: No bulging, leaking, or off-odors.
-
Boil canned meat 10 minutes before tasting (kills potential toxins if present).
Bottom Line: For meatloaf, freezing is the only safe preservation method that maintains texture and flavor. Canning is excellent for plain meats, stews, and sauces with tested recipes, but meatloaf’ complexity breaks the safety rules. When in doubt, choose safety over convenience.
If you decide to can meat, always reference the National Center for Home Food Preservation or USDA Complete Guide to Canning.
Cinnamon French Toast Rolls
Think of these as a cross between French toast, cinnamon rolls, and bite-sized donut holes! They’re soft, gooey, perfect for brunch, and surprisingly simple.
Recipe: Cinnamon French Toast Rolls
Ingredients
For the Rolls:
-
8 slices soft sandwich bread (white, brioche, or Texas toast works best)
-
3 tbsp (45g) softened butter (or cream cheese)
-
¼ cup (50g) granulated sugar
-
1½ tsp ground cinnamon
For the French Toast Dip:
-
2 large eggs
-
¼ cup (60ml) milk (or heavy cream for richness)
-
1 tsp vanilla extract
-
Pinch of salt
For Frying:
-
2 tbsp butter or neutral oil
For the Glaze (Optional but Recommended):
-
½ cup (60g) powdered sugar
-
1–2 tbsp milk or cream
-
½ tsp vanilla extract
Instructions
1. Prep the Bread:
-
Cut crusts off each bread slice. Flatten slightly with a rolling pin.
-
Spread a thin layer of softened butter or cream cheese over each slice.
-
Mix sugar and cinnamon in a small bowl. Sprinkle evenly over butter.
2. Roll Them Up:
-
Tightly roll each slice into a log. Press lightly to seal the edge.
3. Make the French Toast Dip:
-
In a shallow dish, whisk eggs, milk, vanilla, and salt until smooth.
4. Cook the Rolls:
-
Heat butter or oil in a non-stick skillet over medium heat.
-
Dip each roll into the egg mixture, coating all sides (don’t soak too long or they’ll get soggy).
-
Place in skillet, seam-side down. Cook 2–3 minutes per side until golden brown and caramelized.
5. Glaze & Serve:
-
Mix powdered sugar, milk, and vanilla until smooth. Drizzle over warm rolls.
-
Serve immediately with maple syrup for dipping!
Tips for Perfect Rolls
1. Bread Choice:
-
Soft, fresh bread is key — day-old bread can be too dry.
-
Brioche or challah make decadent rolls.
-
For crispier rolls, use thin-sliced bread and roll tightly.
2. Rolling Hack:
-
If bread cracks, microwave slices 5 seconds to soften.
-
Seal the edge with a dab of the egg mixture before cooking.
3. Flavor Variations:
-
Apple Pie: Add 2 tbsp finely grated apple and a pinch of nutmeg to filling.
-
Nutella: Swap cinnamon sugar for 1 tbsp Nutella per slice.
-
Cream Cheese: Mix 2 tbsp cream cheese + 1 tbsp sugar into filling.
-
Savory Twist: Fill with ham & cheese, use egg dip, skip sugar.
4. Make Ahead:
-
Assemble rolls night before; store covered in fridge. Dip and cook in morning.
-
Freeze cooked rolls; reheat in toaster oven or air fryer.
Air Fryer & Baking Instructions
Air Fryer (Easier & Less Mess):
-
Spray rolls lightly with oil or cooking spray.
-
Air fry at 375°F (190°C) for 6–8 minutes, turning halfway.
Oven-Baked:
-
Place on parchment-lined baking sheet. Bake at 400°F (200°C) for 12–15 minutes.
Serving Ideas
-
Breakfast Board: Serve rolls with fresh berries, whipped cream, syrup, and bacon.
-
Dessert: Top with vanilla ice cream and caramel sauce.
-
Kid-Friendly: Let them dip in yogurt or chocolate sauce.
-
Brunch Party: Skewer with toothpicks for easy grabbing.
Why These Are a Hit
-
Portable: No syrup-soaked slices — perfect finger food.
-
Customizable: Sweet or savory, fancy or simple.
-
Quick: Ready in 20 minutes.
-
Clever Use: Great for leftover bread ends or slightly stale bread.
Final Pro Tip: For extra-crispy edges, roll each log in extra cinnamon sugar right after cooking while they’re still hot. It creates a delightful crunchy shell!
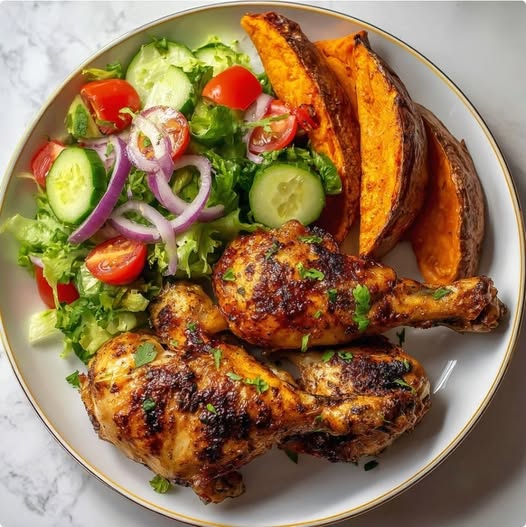
Oven-Baked Chicken Drumsticks with Sweet Potatoes & Fresh Salad
A complete, balanced, and flavorful meal made on one sheet pan (plus a quick salad). Perfect for weeknights, meal prep, or casual entertaining.
Recipe
Ingredients
For the Chicken & Sweet Potatoes:
-
6–8 chicken drumsticks (skin-on for crispness)
-
2 large sweet potatoes, cut into 1-inch chunks
-
3 tbsp olive oil or avocado oil
-
1½ tsp smoked paprika
-
1 tsp garlic powder
-
1 tsp dried thyme or rosemary
-
½ tsp onion powder
-
½ tsp black pepper
-
1 tsp salt (adjust to taste)
-
Optional: 2 tbsp honey or maple syrup (for glaze)
For the Fresh Salad:
-
5 oz mixed greens or baby spinach
-
1 cucumber, sliced
-
1 pint cherry tomatoes, halved
-
½ red onion, thinly sliced
-
Optional: avocado slices, crumbled feta, toasted nuts
For the Lemon-Herb Vinaigrette:
-
¼ cup olive oil
-
2 tbsp lemon juice (or red wine vinegar)
-
1 tsp Dijon mustard
-
1 tsp honey or maple syrup
-
1 garlic clove, minced
-
Salt and pepper to taste
-
Fresh herbs: parsley, dill, or chives (optional)
Instructions
1. Prep Chicken & Sweet Potatoes:
-
Preheat oven to 425°F (220°C). Line a large baking sheet with parchment paper.
-
Pat drumsticks dry with paper towels (key for crispy skin).
-
In a large bowl, toss sweet potato chunks with 2 tbsp oil and half the spices (paprika, garlic powder, thyme, salt, pepper).
-
Arrange sweet potatoes on one side of the baking sheet.
-
In the same bowl, toss drumsticks with remaining 1 tbsp oil and spices until evenly coated. Place on the other side of the sheet, skin-side up.
2. Bake:
-
Bake 25 minutes, then flip sweet potatoes and rotate pan.
-
Bake another 15–20 minutes until chicken reaches 175°F (79°C) internally and sweet potatoes are tender.
-
Optional last 5 minutes: brush drumsticks with honey/maple syrup for a sticky-sweet glaze.
3. Make Salad & Dressing:
-
While baking, whisk all vinaigrette ingredients in a small jar or bowl.
-
Toss salad vegetables with dressing just before serving.
4. Serve:
-
Plate drumsticks and sweet potatoes alongside the fresh salad.
-
Garnish with extra herbs if desired.
Key Techniques for Success
1. Crispy Chicken Skin:
-
Pat chicken dry before seasoning.
-
Don’t overcrowd the pan — leave space between pieces.
-
High heat (425°F) renders fat and crisps skin.
-
Skin-side up the entire time.
2. Perfect Sweet Potatoes:
-
Cut uniform sizes for even cooking.
-
Toss in oil and spices separately from chicken (to prevent cross-contamination and ensure even coating).
-
Place cut-side down on the pan for better caramelization.
3. Flavor Variations:
-
Spicy: Add ½ tsp cayenne or chipotle powder to spice mix.
-
Mediterranean: Use oregano, lemon zest, and serve with tzatziki.
-
BBQ: Brush with BBQ sauce last 10 minutes of baking.
4. Meal Prep Friendly:
-
Chop sweet potatoes and season chicken ahead; store separately in fridge up to 24 hours.
-
Cook, then store portions for 3–4 days. Reheat in oven or air fryer to maintain crispness.
Dietary Adjustments
Gluten-Free: Naturally GF — check spice blends for additives.
Dairy-Free: Omit feta from salad; recipe is naturally dairy-free.
Lower Carb: Replace sweet potatoes with cauliflower or Brussels sprouts.
Paleo/Whole30: Omit honey, use compliant mustard and spices.
Why This Meal Works
-
Balanced macros: Protein (chicken), complex carbs (sweet potatoes), fiber & vitamins (salad).
-
Easy cleanup: One sheet pan + one salad bowl.
-
Family-friendly: Drumsticks are universally loved, sweet potatoes are naturally sweet.
-
Versatile: Swap veggies (carrots, broccoli, bell peppers) or use chicken thighs.
Wine Pairing
-
Chardonnay (lightly oaked) or a dry Rosé.
-
For beer: Pale ale or lager.
